Step 1: Create a repository
Prerequisite: Signup for a GitHub account and Login to your GitHub account.
Create a new repository →
Repository Name : ClassLibToWebApp
Add Description
Choose Public from Public/Private Option
Add a Readme.md by checking the Checkbox.
Click on the create repository button.
Confirm repository created on seeing the Repository created successfully message

Step 2: Clone the repository to local machine:
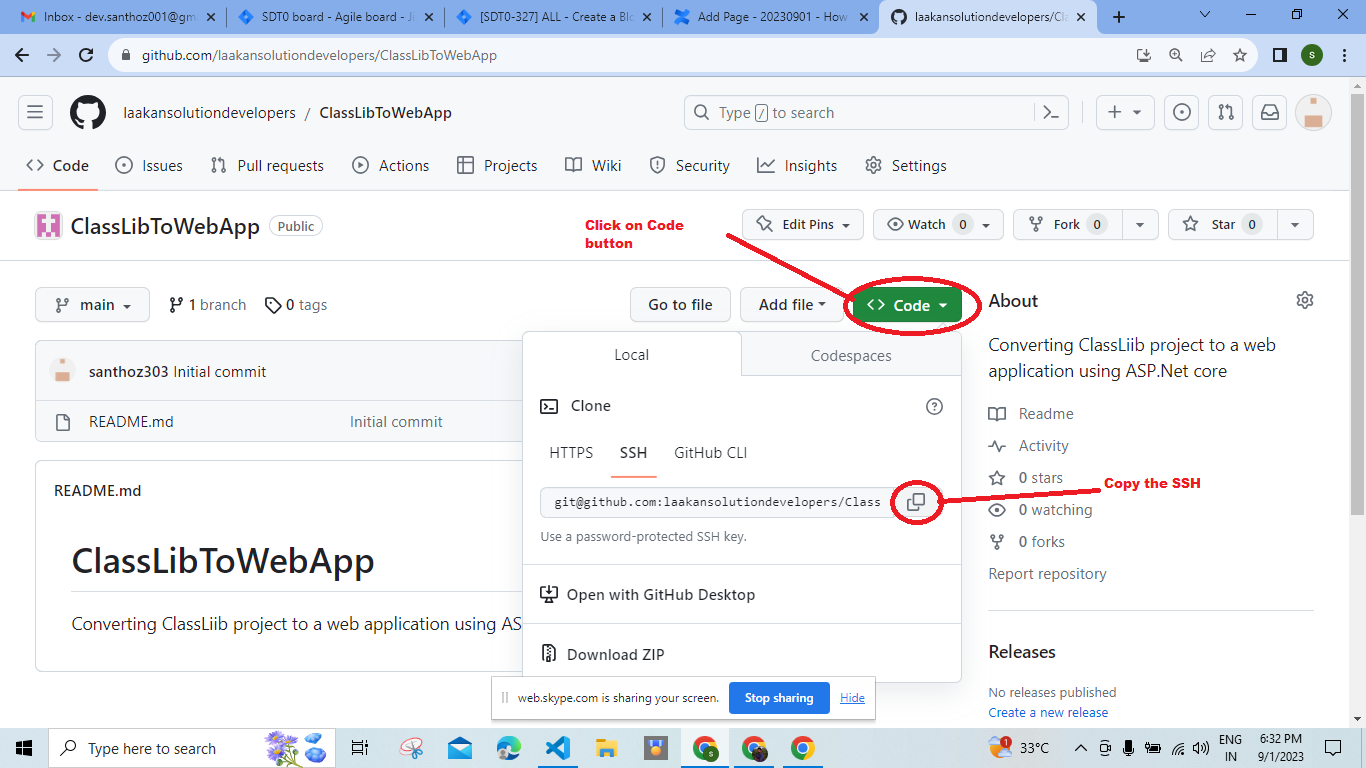
Go to GitHub Server → Open your repository → Click on Code button
Copy the SSH
Step3: Make a directory in local machine WSL
Open WSL terminal
Ensure you are in home directoryMake a directory 2023 - mkdir 2023
Change directory to 2023 - cd 2023
Make a directory 202309 - mkdir 202309
Change directory to 202309- cd 202309
Make a directory 20230901 - mkdir 20230901
Change directory to 20230901 - cd 20230901
Step4: Go to the WSL terminal and Choose the path to clone the repository.
Make sure we are inside 2023/202309/20230901 directory
Use the command git clone to clone the repository.
git clone git@github.com:laakansolutiondevelopers/ClassLibToWebApp
Step5: Change the directory to the repository folder.
cd ClassLibToWebApp
Step6: Create a branch.
After cloning the repository, Create a branch in it using the git branch command.
git branch users/all/20230901_Initial_Setup
To Change the branch use the command below
git checkout users/all/20230901_Initial_Setup
Step7: Create a solution file.
Create a solution file using the command given below,
dotnet new solution
Step8: Add a gitignore file.
dotnet new gitignore
Step9: Create a Classlib project as LS.Proj
dotnet new classlib -o LS.Proj
Once we run this command, we are able to see the files below : use ll command
Class1.cs
LS.Proj.csproj
Obj
Step 10: For Classlib project Add a gitignore
Copy the gitignore from repository to the Project folder
cp .gitignore LS.Proj/
Step 11: Add solution for classlib project.
dotnet sln add LS.Proj/LS.Proj.csproj
Step 12: Change the classlib project to web app by adding and modify the project.
(Use the Visual Studio Code Editor)
Type the command code . to redirect to the Visual Studio Code Editor.
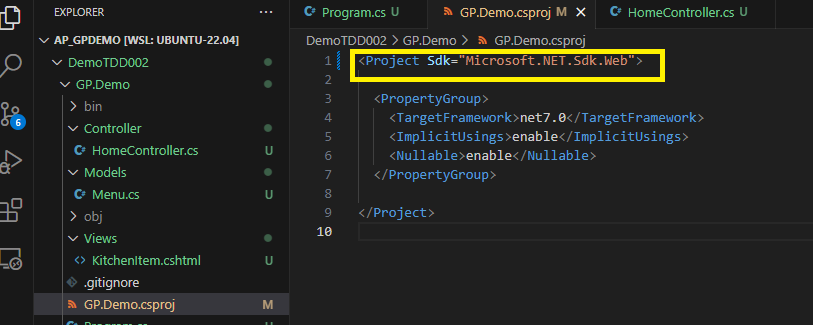
Step 13: Go to LS.Proj.csproj file:
update <Project Sdk="Microsoft.NET.Sdk"> to <Project Sdk="Microsoft.NET.Sdk.Web">
<Project Sdk="Microsoft.NET.Sdk.Web">
<PropertyGroup>
<TargetFramework>net7.0</TargetFramework>
<ImplicitUsings>enable</ImplicitUsings>
<Nullable>enable</Nullable>
</PropertyGroup>
</Project>
→ In above Screenshot for web application, add .web extension at the end<Project Sdk="Microsoft.NET.Sdk.Web">
Step 14 : Rename Class1.cs file to StartHere.cs (Use F2 button to rename file)
Change the class name to StartHere.
Example of Project is given below:
Create a Main Method
namespace LS.Proj;
public class StartHere
{
public static void Main(string[] args)
{
Console.WriteLine("Start of Web Application");
WebApplication webApp = WebApplication.Create(args);
webApp.MapGet("/", () => HelloWorld());
webApp.MapGet("/ap", () => HelloWorld("Akia"));
webApp.MapGet("/rr", () => HelloWorld("Rangan"));
webApp.MapGet("/sc", () => HelloWorld("Santhoz"));
webApp.Run();
Console.WriteLine("End of Web Application");
}
public static string HelloWorld(string name = null)
{
if (string.IsNullOrEmpty(name))
{
return "You are at HelloWorld Path.";
}
else
{
return $"you are {name}.. Welcome to Web Application development";
}
}
}
15. Build the Project
dotnet build
16. Run the Project
dotnet run --project LS.Proj
17. Output
Start of Web Application
info: Microsoft.Hosting.Lifetime[14]
Now listening on: http://localhost:5000

In browser :
paste the link copied at URL box: http://localhost:5000

To open developer tools:
Use the shortcut → Ctrl+Shift+i

Quiz:
What is classlib?
What is Web Application?
What is a Web Site?
Which template can you use to create a web application in dotnet core?
What is a command to create classlib project?
How to create a solution file?
What is URL?
What is endpoint in URL?
SDK stands for?
How to compile a C# project?
To check your answer please visit: Quiz Answers
Glossary of Terms:


No comments:
Post a Comment